
Hydroponic experiments for kids are the perfect way to teach real scientific method while growing actual food. Unlike most science experiments that produce abstract results or volcano-style spectacles, these experiments teach children to observe, hypothesise, test variables, and draw conclusions — all while growing edible plants. The 5 experiments in this guide have been tested with real children aged 6-12 and consistently produce both successful learning and visible growing results.
Each experiment uses inexpensive materials (under £20 total for all 5), takes 1-4 weeks to complete, and teaches a different scientific concept. By the end, you will have a complete curriculum for introducing children to plant science through hands-on hydroponic discovery.
🔬 The Science Method Goal
These hydroponic experiments for kids teach the complete scientific method: observation, hypothesis, controlled testing, data collection, and conclusion. The same process used by real scientists, scaled to kitchen-counter projects children can complete independently.
What makes good hydroponic experiments for kids?
Not every science experiment is suitable for children. The best hydroponic experiments for kids share specific characteristics that make them educational, engaging, and successful even when adults are not constantly supervising.
| Quality | Why It Matters |
|---|---|
| Single variable testing | Teaches controlled experiment design |
| Visible results | Children need to see clear differences |
| Reasonable timeframes | 7-21 days matches attention spans |
| Safe materials | Nothing dangerous if mishandled |
| Real concepts | Teaches actual science not just play |
According to educational research from Science Buddies, hands-on plant experiments are among the most effective ways to teach scientific method because the slow, visible changes give children time to observe and predict what will happen next.
Which is the number 1 best hydroponic experiment for kids?
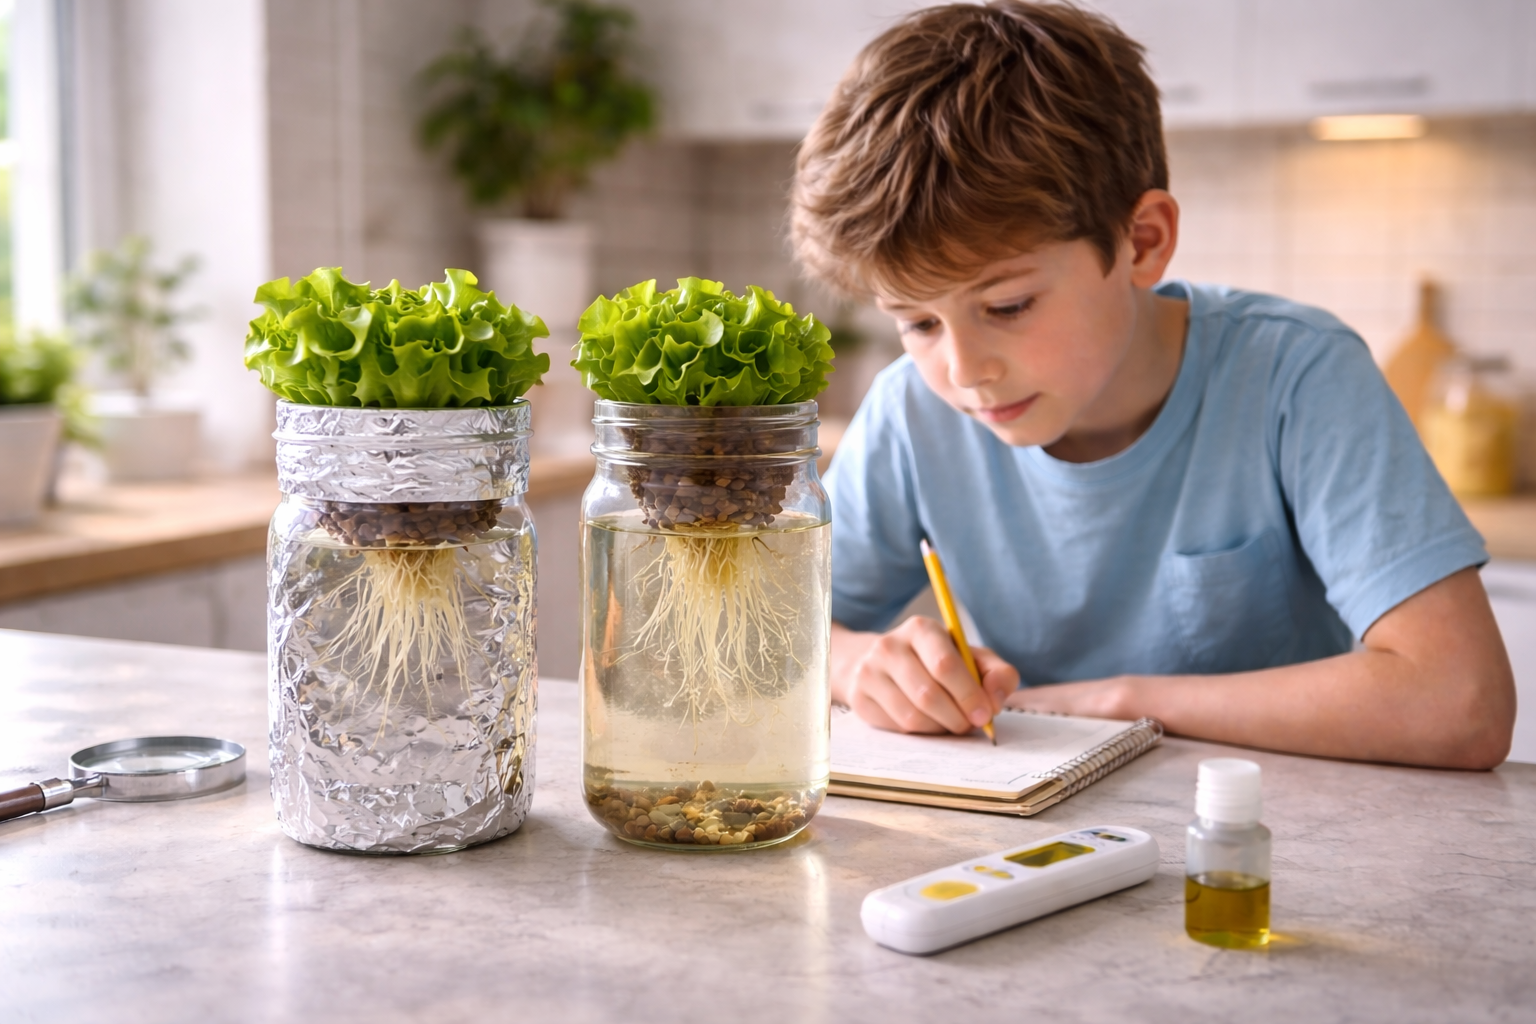
#1Light vs Darkness — How important is sunlight?
The light vs darkness experiment is the perfect first project among hydroponic experiments for kids because it teaches photosynthesis through dramatic visible results. Two identical setups grow plants in completely different lighting conditions, producing strikingly different outcomes within just 2 weeks.
🔬 Materials Needed
- 2 identical mason jars with net pots
- 2 lettuce or basil seedlings
- Hydroponic nutrients and water
- A dark cupboard for one jar
- Total cost: £10-15 if starting from scratch
How to run the experiment:
- Set up two identical jars with the same nutrients, water, and seedlings
- Place one jar on a sunny windowsill with at least 6 hours of light daily
- Place the other jar in a dark cupboard with no light at all
- Have the child predict what will happen to each jar
- Check both jars daily and record observations in a notebook
- After 14 days, compare the results and discuss what happened
What kids learn: The plant in the light grows green and healthy. The plant in the dark grows tall and pale (a phenomenon called etiolation) as it desperately searches for light, eventually dying. This dramatically demonstrates that plants need sunlight to make food through photosynthesis. According to plant biology research compiled by the Royal Horticultural Society, this experiment shows the same etiolation response real scientists study in plant biology labs.
#2pH Test — Why does water chemistry matter?
The pH experiment is one of the most popular hydroponic experiments for kids because it produces colourful visual results from the pH test drops. Children love watching liquid change colour like magic, and the underlying chemistry lesson sticks because it is so visually memorable.
Materials needed:
- 3 identical jars with seedlings and nutrients
- pH test kit (drops with colour chart)
- White vinegar (lowers pH)
- Baking soda (raises pH)
How to run the experiment: Set up three jars with identical nutrients and plants. Use the pH test kit to measure each. Add white vinegar to one to lower its pH to about 4.0 (too acidic). Add baking soda to another to raise its pH to about 8.0 (too alkaline). Leave the third at the proper 5.5-6.5 range. Observe over 2-3 weeks how the plants in extreme pH suffer compared to the properly balanced one.
This teaches children that pH controls whether plants can absorb nutrients, even when the nutrients are physically present in the water. It is one of the most important lessons in any of the hydroponic experiments for kids because pH is fundamental to plant biology.
#3Different Nutrient Levels — Is more always better?
This experiment teaches children that “more is not always better” when it comes to nutrients. Three jars receive different nutrient strengths: half the recommended amount, the correct amount, and double the recommended amount. The plant in double-strength solution actually grows worse than the others, displaying nutrient burn symptoms that demonstrate concentration affects absorption.
#4Plant Variety Comparison — Why are plants different?
One of the simpler hydroponic experiments for kids is comparing how different plants grow in identical conditions. Set up 4 jars with lettuce, basil, mint, and coriander in identical setups. Track how each grows differently — different germination times, growth rates, leaf shapes, and harvest schedules. This teaches biological variation between species.
#5Aeration Test — Do roots need air?
This experiment compares two setups: one Kratky jar where roots have an air gap above the water (correct setup) and one where the water completely fills the jar with no air gap (incorrect setup). Within a few days, the plant without aeration starts to develop root rot while the properly aerated plant thrives. This dramatically teaches children that plant roots need oxygen, not just water and nutrients.
All 5 experiments use the same basic setup — see our mason jar hydroponics guide for the complete step-by-step build children can follow independently.
How do you turn experiments into real learning?
The experiments themselves are valuable, but the learning multiplies when you guide children through proper scientific thinking around them. Here is how to maximise educational value from any of these hydroponic experiments for kids.
Use the proper scientific method format
📋 Scientific Method Worksheet
- Question: What are we trying to find out?
- Hypothesis: What do we think will happen and why?
- Materials: What do we need?
- Procedure: What steps will we take?
- Observations: What did we see happen?
- Results: What were the measurements?
- Conclusion: Was our hypothesis correct? Why or why not?
Encourage prediction before observation
Before starting any experiment, ask children to predict the outcome and explain their reasoning. This is the heart of scientific thinking — forming hypotheses before testing. Children often surprise themselves by being correct or learn from being wrong, both of which are valuable.
Connect results to real-world applications
After each experiment, discuss why the result matters in the real world. Why do farmers care about pH? How do astronauts grow food on the International Space Station (real research from NASA)? Why might vertical farms help feed cities sustainably? These connections turn experiments from games into meaningful learning.
Intermediate level: combining multiple variables
Once children have completed individual experiments successfully, more advanced hydroponic experiments for kids can test multiple variables at once. This introduces concepts of complex experimental design and data analysis that mirror real scientific research.
The 4-jar matrix experiment
Set up 4 jars testing 2 variables together: light intensity (high/low) and nutrient strength (full/half). Each jar tests a different combination. This teaches children that real systems have multiple interacting factors, not just single variables.
Data tracking over time
Older children can measure plant height every 2-3 days and graph the results. This connects experimental observation to mathematical representation, teaching both scientific and analytical skills simultaneously.
What next? Beyond basic hydroponic experiments for kids
After completing these 5 experiments, here are natural next steps for children who want to continue their hydroponic science journey:
- Design original experiments based on questions the child wants to answer
- Enter a science fair — see our 10 best hydroponic science fair project ideas for award-winning templates
- Start a proper teaching curriculum with our teaching kids hydroponics guide
- Connect with other young scientists through resources like National Geographic Kids
- Try more advanced systems like DWC buckets or vertical towers
- Try faster experiments with microgreens hydroponics for 7-day results
- Read about commercial hydroponics and modern food production technology
Frequently asked questions about hydroponic experiments for kids
What age can children start hydroponic experiments?
Children as young as 6 can participate in basic hydroponic experiments for kids with adult supervision. They may need help with measuring nutrients and recording observations, but they can fully participate in setup, daily checks, and analysing results. By age 9-10, most children can run experiments largely independently.
How long should each experiment take?
Basic experiments take 7-14 days to show clear results. Light vs darkness experiments produce visible changes within 5-7 days. pH experiments need 2-3 weeks to see full effects. Plan to dedicate 5 minutes per day to observation and recording during the experiment period.
Can these experiments be done in classrooms?
Yes, all 5 experiments work excellently in classroom settings. A single classroom setup of 12-15 jars can accommodate small group experiments with multiple variables tested simultaneously. Teachers can find complete classroom-ready curricula at Science Buddies.
What if my child loses interest mid-experiment?
Some children lose interest during slow growth phases. Combat this by taking daily photos to create a visible time-lapse, setting calendar reminders for observation days, and celebrating small milestones. If interest fades completely, the experiment can become a parent-managed display the child observes occasionally rather than a daily commitment.
Are these experiments safe for unsupervised children?
The experiments themselves are safe, but young children should be supervised when measuring nutrients and using vinegar or baking soda. Once setup is complete, daily observation can be done independently with no safety concerns. Store all liquid chemicals out of reach of small children when not in use.
Can these hydroponic experiments for kids be used for homeschool curriculum?
Absolutely. Many homeschool families use hydroponic experiments as their primary biology curriculum because they teach plant science, chemistry, and the scientific method simultaneously through hands-on learning. A complete grow cycle with experiments can replace several weeks of textbook biology lessons.
Related posts you might find useful
- Teaching Kids Hydroponics: The Best STEM Project — Background and setup guide
- How to Explain Hydroponics to a Child — Age-appropriate language scripts
- 10 Best Hydroponic Science Fair Project Ideas — Taking experiments further
- 7 Best Kid Friendly Hydroponic Kits for 2026 — Ready-made alternatives
- Mason Jar Hydroponics for Beginners — The basic setup used in all 5 experiments
- Microgreens Hydroponics: First Harvest in 7 Days — Faster experiments for shorter attention spans
- What Is Hydroponics? A Plain-English Explanation — Background reading for parents
Master Kids Hydroponic Education
Our 25-page ebook Teaching Kids Hydroponics includes 20+ experiments with worksheets, age-appropriate explanations, complete classroom curriculum, and observation templates ready to print.
✓ 20+ experiments · ✓ Scientific method worksheets · ✓ UK curriculum aligned · ✓ Instant PDF download