
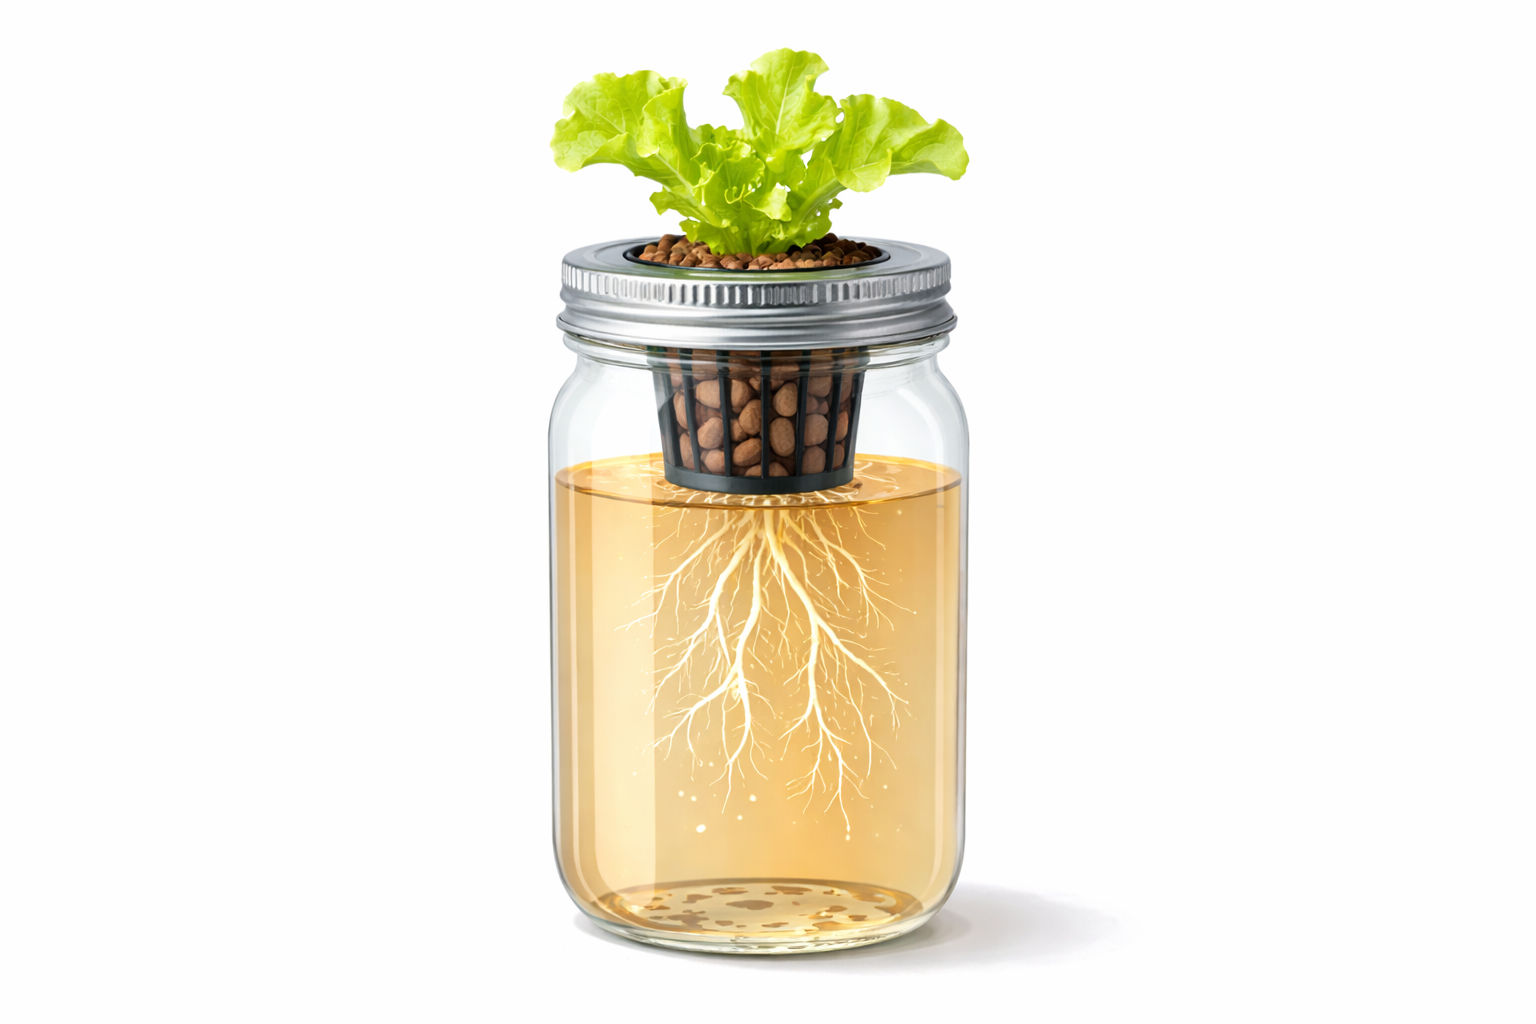
The kratky method hydroponics approach is the simplest way to grow food that exists. No pump, no timer, no electricity, no daily maintenance. You fill a container with nutrient solution, place a plant on top, and walk away. Six weeks later, you harvest fresh lettuce or herbs that you grew with barely any effort at all.
If that sounds too good to be true, it is not. The kratky method hydroponics system was developed by Professor B.A. Kratky at the University of Hawaii and has been validated by decades of research and thousands of home growers worldwide. It is the entry point that converts more curious beginners into committed hydroponic growers than any other method.
This guide explains exactly how kratky method hydroponics works, why it works, what you need to set it up, and how to grow your first crop from start to harvest.
⚡ The Zero-Electricity Promise
The kratky method uses no pump, no timer, and no electricity whatsoever. A complete setup costs £15-20, takes 2 minutes per week to maintain, and produces a full head of lettuce in 6 weeks. It is the most beginner-friendly hydroponic method that exists.
What is the kratky method?
The kratky method is a form of passive hydroponics. Unlike Deep Water Culture (DWC), which uses an air pump to oxygenate the water, or Nutrient Film Technique (NFT), which uses a water pump to circulate solution through channels, the kratky method uses no equipment at all beyond a container and nutrient solution.
A plant sits in a net pot above a reservoir of nutrient-rich water. The roots grow down into the solution and absorb water and minerals. As the plant drinks, the water level drops. This creates an air gap between the water surface and the net pot. Roots that grow into this air gap absorb oxygen directly from the air, which is essential for healthy root function.
The genius of kratky method hydroponics is that this air gap replaces the air pump entirely. The system is self-regulating: as the plant grows bigger and needs more oxygen, it drinks more water, which enlarges the air gap, which provides more oxygen. No intervention required. For the detailed comparison, see our Kratky vs DWC guide.
Why the kratky method is perfect for beginners
Most hydroponic methods involve at least some equipment and regular maintenance. The kratky method eliminates almost all of it. Here is why beginners love it:
- Zero electricity: No pumps, no timers, no grow lights required (though a grow light helps in winter). Your electricity bill does not change at all.
- Zero noise: With no pump running, the system is completely silent. Perfect for apartments, bedrooms, and shared spaces.
- Near-zero maintenance: Check once a week. That is the entire maintenance routine. Total weekly time investment: 2 minutes.
- Extremely cheap: A complete kratky method hydroponics setup costs £10-20 for the first jar. Subsequent jars cost £1-3 each.
- Very forgiving: The large volume of nutrient solution buffers against small mistakes in pH or nutrient concentration. Plants in kratky systems tolerate more error than in any other hydroponic method.
- No risk of pump failure: In DWC, if the air pump dies overnight, roots can suffocate within hours. In kratky method hydroponics, there is no pump to fail. The system is inherently resilient.
How the three root zones work
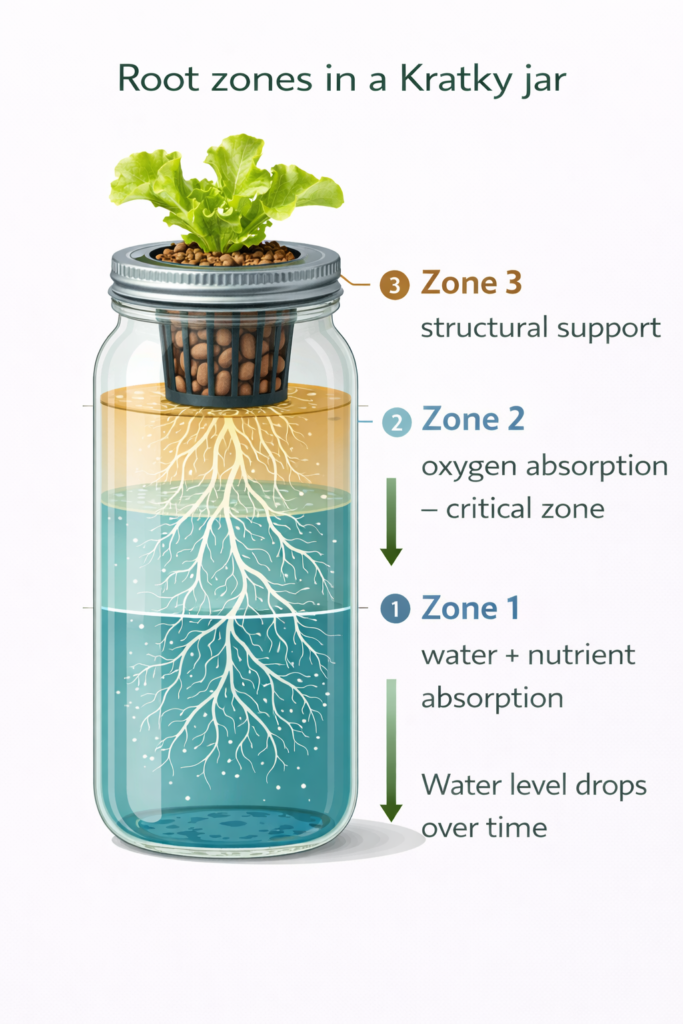
Understanding what happens inside the container helps you trust the process and avoid the most common mistake (interfering with a system that is working perfectly).
A mature plant in a kratky method hydroponics system develops three distinct root zones:
| Root Zone | Location | Function |
|---|---|---|
| Zone 1 — Submerged | Bottom (in nutrient solution) | Absorbs water and dissolved minerals. White or cream, firm. |
| Zone 2 — Air gap | Middle (in the air gap) | Absorbs oxygen. Often fuzzy with fine root hairs (healthy, not mould). |
| Zone 3 — Support | Top (through clay pebbles) | Anchors plant physically. Does not absorb significant nutrients. |
This three-zone system is completely self-regulating. As the plant grows, it drinks faster, which lowers the water level, which expands the air gap, which provides more oxygen to support the increasingly large root system. It is a virtuous cycle that requires zero human intervention.
The equipment you need (and nothing more)
A complete kratky method hydroponics setup requires these items and only these items:
🛒 Complete Kratky Shopping List
| Opaque container Mason jar, food container, or bucket (wrap if clear) |
£0-5 |
| 3-inch net pot Small mesh basket that holds the plant |
£0.50 |
| Clay pebbles (LECA) Bag lasts 10+ jars |
£3-5 |
| Hydroponic nutrients Liquid or dry, bottle lasts months |
£8-12 |
| pH test drops To check the 5.5-6.5 range |
£4-6 |
| pH Down Almost always needed with UK tap water |
£3-5 |
| Seeds Lettuce, basil, mint, or any herb |
£1-2 |
| Total First Jar | £19-35 |
The nutrients, pH drops, and pH Down last for months across many grows. Each subsequent kratky jar costs just £1-3. For the full step-by-step jar assembly, see our kratky jar setup in under 10 minutes guide.
Things you do NOT need: an air pump, a water pump, a timer, electricity, an EC meter, a grow tent, or any specialist equipment. The entire system runs on gravity and plant biology.
Step-by-step setup guide
Phase 1Germinate your seeds (day 1-7)
Dampen a paper towel or rock wool cube. Place 2-3 seeds on the surface. For lettuce, do not cover the seeds because they need light to germinate. Place on a saucer, cover loosely with cling film, and put in a warm spot (20-25°C). Check daily and mist if the surface looks dry. Seeds germinate in 3-7 days for most herbs and lettuce. Wait until the seedling has its first true leaves (the second pair, after the round seed leaves) before transplanting.
Phase 2Prepare the kratky jar (day 5-7)
Wrap your container in aluminium foil to block light. Fill with water to 1 centimetre below where the net pot will sit. Add nutrients at half the recommended strength. Stir well. Test pH and adjust to 5.5-6.5 using pH Down drops. The golden rule: always add nutrients BEFORE testing pH.
Phase 3Transplant (day 7-10)
Fill the net pot one-third with rinsed clay pebbles. Place the seedling in the centre. Add more pebbles around it for support. Place the net pot in the container opening so the bottom touches the nutrient solution. Some solution should wick up through the pebbles to keep the young roots moist.
Phase 4Position and wait (day 10 onwards)
Place on a sunny windowsill (south-facing is best in the UK). If light is limited, add a clip-on grow light (£10-15) set to 14-16 hours per day. Now leave it alone. Check once a week. Do not refill. Do not add nutrients. Do not move it around. The kratky method hydroponics system works best when you trust the process and resist the urge to interfere.
The number one mistake: refilling the container
This deserves special emphasis because it kills more kratky plants than any other error. As the water level drops, beginners see the shrinking reservoir and assume something is wrong. They refill the jar to the top, submerging the oxygen-absorbing air roots that developed in the gap.
These air roots suffocate within hours when submerged. The plant develops root rot and dies — not from lack of water, but from too much water destroying the air roots it depends on for oxygen.
⚠️ The Golden Rule
The dropping water level is how kratky method hydroponics is designed to work. It is not a problem to fix. Only add water if the level has dropped so far that no roots are touching the solution at all, and even then add only a small amount of pH-adjusted water. Never refill to the original level.
For more troubleshooting situations beyond refilling, see our kratky method troubleshooting guide.
Best crops for kratky method hydroponics
The kratky method works best with fast-growing, compact plants that complete their life cycle before the nutrient solution runs out. The ideal crops are:
| Crop | Time to Harvest | Notes |
|---|---|---|
| Butter lettuce | 30-45 days | The perfect first kratky crop. Forgiving, fast, delicious. |
| Basil | 21-28 days | Continuous production for months with regular pinching. |
| Mint | 30-40 days | Virtually indestructible. Grows aggressively in any container. |
| Coriander | 21-30 days | Fast but bolts quickly in warm conditions. |
| Pak choi | 30-45 days | Fast Asian green, excellent in stir-fries. |
| Microgreens | 7-14 days | The fastest possible kratky harvest. |
Avoid large fruiting crops (tomatoes, peppers, cucumbers) in small kratky jars. They drink too much water and need too many nutrients for a passive system. They can work in large kratky tubs (20+ litres) but are better suited to DWC for beginners. For the complete ranked list, see our best plants for kratky method guide.
Week-by-week timeline for kratky lettuce
Here is exactly what to expect and what to do each week when growing lettuce using the kratky method hydroponics approach:
| Week | What’s Happening | Your Job |
|---|---|---|
| Week 1 | Seeds germinating on damp paper towel | Keep it moist, wait |
| Week 2 | Seedling transplanted into kratky jar | Nothing. Just observe |
| Week 3 | Roots growing into nutrient solution | Peek at roots if curious. They should be white. |
| Week 4 | Visible leaf growth accelerating, water level dropping | Nothing. This is normal |
| Week 5 | Large leaves forming, significant air gap visible | Optional pH check |
| Week 6 | Harvest ready — full head of lettuce | Harvest and enjoy |
Scaling from one jar to a windowsill garden
Once your first kratky jar is growing successfully, the natural next step is starting more. The most effective approach is staggered planting: start a new jar every 5-7 days. After 4-5 weeks, you have jars at every growth stage. When you harvest one, start a new one in its place. This creates a permanent rotation of fresh food.
A standard windowsill holds 4-6 jars comfortably. A shelf with a grow light holds 8-12. A dedicated growing rack can hold 20+. The kratky method hydroponics approach scales horizontally by simply adding more containers. Each additional jar costs just £1-3 since you already own the nutrients and pH supplies.
Suggested 6-jar rotation: two lettuce (staggered 2 weeks apart), one basil, one mint, one coriander, one parsley. This provides continuous salad greens and cooking herbs for a fraction of supermarket prices.
Kratky vs DWC: when to upgrade
The kratky method is brilliant for beginners and remains useful even for experienced growers, but there are situations where DWC (adding an air pump) produces better results:
- Stay with kratky if you grow herbs and leafy greens, value simplicity and silence, have limited space, or want the lowest possible cost and maintenance.
- Consider DWC if you want faster growth rates, plan to grow larger plants like tomatoes or peppers, or want to maximise yield per plant.
Many growers use both: kratky jars on the windowsill for herbs and a DWC bucket for a larger crop. The skills are identical and transfer seamlessly between the two methods. Our Kratky vs DWC comparison covers the full decision framework.
Frequently asked questions about kratky method hydroponics
Is the kratky method really as simple as it sounds?
Yes. Once the jar is set up, total maintenance time is about 2 minutes per week. Check the water level, check that the plant looks healthy, and that is it. No pumps to monitor, no daily tasks, no nutrient adjustments mid-grow. This is why it is the recommended starting method for absolute beginners.
Can I grow kratky plants without any grow lights?
Yes, if you have a sunny south-facing windowsill. In UK winter months (November-February), supplemental lighting helps because natural daylight drops below 10 hours. A basic clip-on grow light (£10-15) running 14 hours per day solves this completely.
Do I need to change the nutrient solution during growing?
No. This is the core feature of kratky method hydroponics. You mix the solution once at the start and the plant drinks it over the entire grow cycle. One fill lasts 4-6 weeks for a typical lettuce plant. This is the fundamental difference from DWC and other active systems.
Why does my kratky water turn cloudy or smell bad?
Cloudy or smelly water usually indicates bacterial contamination. Causes include dirty net pots, contaminated seeds, water temperature too high (above 22°C), or light leaking into the container. Prevention: clean equipment thoroughly, keep the container completely light-tight, and grow in cool spots away from radiators.
Can kratky grow tomatoes and peppers?
Yes in large tubs (20+ litres) but not in small jars. Fruiting crops drink too much water and need continuous feeding that small kratky containers cannot support. If you want to grow tomatoes or peppers, DWC with an air pump is more reliable. Kratky is best for leafy greens and herbs.
What is the air gap for and how big should it be?
The air gap (the space between the water surface and the bottom of the net pot after water drops) is where oxygen-absorbing roots grow. It should start at 0cm (water touching pot bottom) and naturally grow to 5-10cm by harvest. If no air gap forms after 2 weeks, your plant is not drinking enough — check light levels and pH.
Related posts you might find useful
- Kratky Jar Setup in Under 10 Minutes — Step-by-step jar assembly guide
- Kratky vs DWC: Which Passive System Is Better? — Head-to-head comparison
- Best Plants for Kratky Method Ranked — Success rate by variety
- Kratky Method Troubleshooting Guide — Diagnose and fix common issues
- Mason Jar Hydroponics for Beginners — The simplest kratky starter method
- What Is Hydroponics? Plain English Explanation — Background reading
- 10 Easy Hydroponic Plants Almost Impossible to Kill — Forgiving crops for any method
Master the Kratky Method
Our 22-page ebook The Kratky Method: Hydroponics Without Electricity covers single jars, multi-plant tubs, nutrient schedules, a complete week-by-week calendar, troubleshooting, and advanced techniques.
✓ Week-by-week calendar · ✓ Multi-plant tub designs · ✓ Troubleshooting guide · ✓ Instant PDF download