
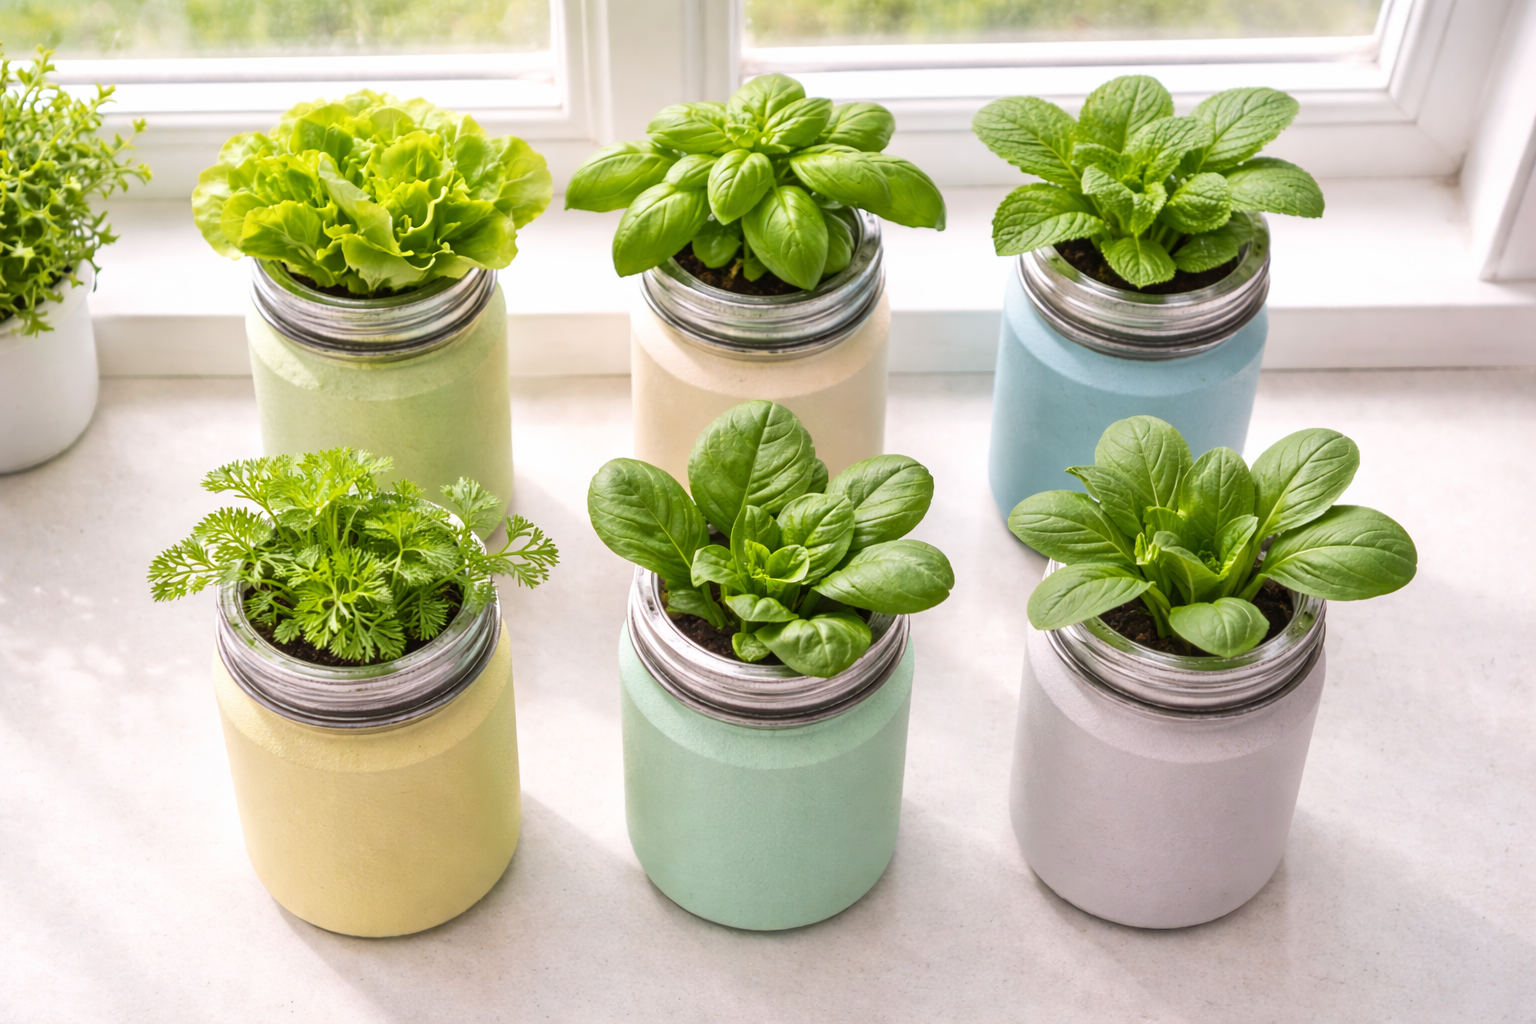
A kratky jar setup is the fastest way to go from zero experience to a working hydroponic system. In under 10 minutes of active assembly time, you can build a passive growing system that produces fresh lettuce, basil, or herbs with no pump, no electricity, and no daily maintenance.
This guide gives you the exact steps, exact measurements, and exact timings for a successful kratky jar setup. No guesswork, no vague instructions, no assumptions about what you already know. If you can follow a recipe, you can do this.
⏱️ The 10-Minute Promise
Active assembly time is under 10 minutes. You do need a pre-germinated seedling (started 7-10 days earlier) and all materials gathered before you begin — the actual build is quick, but prep matters. Total cost for your first jar: £15-20.
What you need for your kratky jar setup
Gather everything before you start. The assembly itself takes under 10 minutes, but hunting for materials mid-build wastes time and creates frustration.
🛒 Complete Kratky Jar Materials List
| Wide-mouth mason jar (1 litre) Jam jar, coffee jar, or food container works |
£0-3 |
| 3-inch net pot £3-5 for a 10-pack on Amazon UK |
£0.50 |
| Clay pebbles (LECA) Small bag fills 6-10 net pots |
£3-5 |
| Hydroponic nutrients Formulex (simplest) or Flora Series |
£8-12 |
| pH test drops Hundreds of tests per kit |
£4-6 |
| pH Down solution Bottle lasts months |
£3-5 |
| Aluminium foil To block light from the solution |
£1-2 |
| Pre-germinated seedling Started 7-10 days earlier |
£1-2 |
| Total First Jar | £20-35 |
After this initial purchase, each additional kratky jar costs just £1-3 because you already own the nutrients, pH supplies, and clay pebbles. For full context on why kratky works so well, see our complete kratky method hydroponics guide.
Pre-setup: germinating your seeds (7-10 days before)
You need a seedling ready before you can complete your kratky jar setup. Start this step 7-10 days before you plan to assemble the jar.
Dampen a paper towel until it is thoroughly moist but not dripping. Fold it in half and place it on a small plate or saucer. Place 2-3 seeds on the surface. For lettuce, leave them uncovered because lettuce seeds need light to trigger germination. For basil, press them lightly into the surface without burying them.
Cover the plate loosely with cling film or slip it into an unsealed plastic bag. This traps moisture while allowing air exchange. Place in a warm spot: a kitchen counter, the top of a router (gentle warmth), or near (not on) a radiator. Ideal temperature is 20-25°C.
Check daily. Mist with a spray bottle if the paper towel surface begins to dry out. Keep it consistently damp but not waterlogged. Soggy conditions encourage mould; dry conditions kill the germinating seed.
Lettuce germinates in 3-5 days. Basil takes 5-10 days. You will see a tiny pale stem appear first, followed by two small rounded seed leaves (cotyledons). Wait until the first pair of true leaves develops (they look different from the seed leaves — more textured and shaped like the adult plant’s leaves). This typically happens 7-14 days after sowing. Your seedling is now ready for the kratky jar setup.
The 10-minute kratky jar setup (step by step)
Minute 1-2Wrap the jar
Tear off a piece of aluminium foil large enough to wrap completely around your jar with some overlap. Press the foil tightly against the glass, folding the edges neatly at the top and bottom. The goal is to block all light from reaching the nutrient solution inside. Light causes algae growth, which competes with your plant for nutrients and turns the water green.
Cover the bottom of the jar as well. Light can reflect off surfaces and enter from below. A thorough foil wrap takes 60-90 seconds and prevents the single most common cosmetic issue in kratky growing.
If you want a more attractive kratky jar setup, paint the jar with acrylic paint (any dark colour) instead of using foil. This looks much better on a kitchen windowsill and blocks light just as effectively.
Minute 2-3Check the net pot fit
Place the 3-inch net pot in the jar opening. The lip of the net pot should rest on the rim of the jar, holding the basket portion inside the jar without falling through. The bottom of the net pot should hang approximately 3-5 centimetres below the rim.
If the net pot is too small and falls through, cut a circle of cardboard slightly larger than the jar opening, cut a hole in the centre just big enough for the net pot basket to pass through, and place this cardboard collar on the jar rim. The net pot lip rests on the cardboard instead of the jar rim.
Minute 3-5Mix the nutrient solution
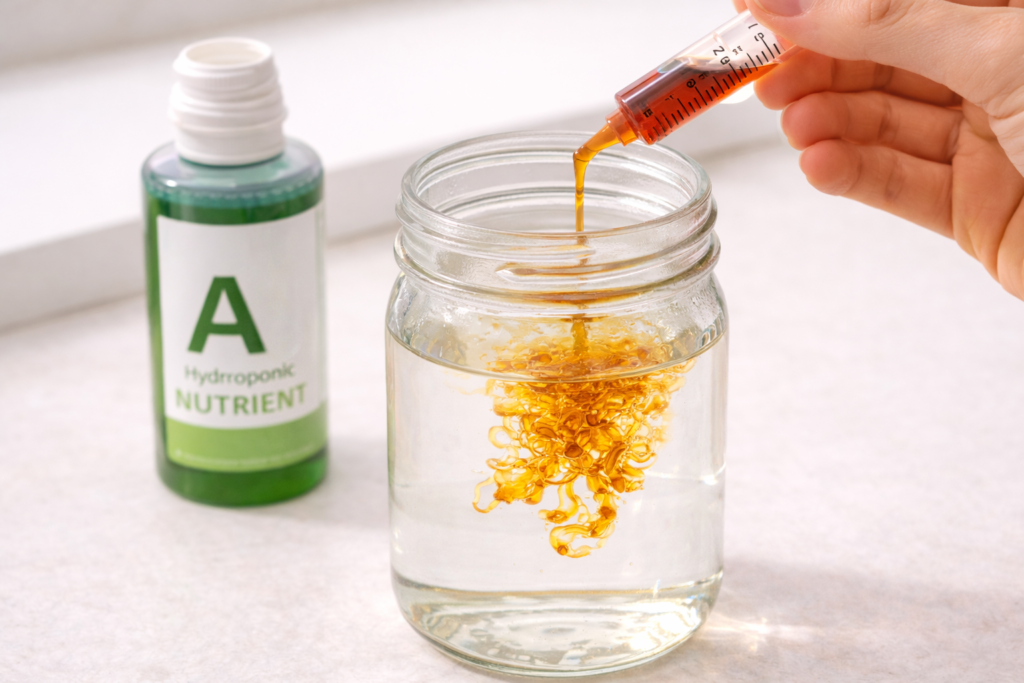
Remove the net pot temporarily. Fill the jar with room-temperature tap water to approximately 1 centimetre below where the bottom of the net pot sits. For a 1-litre jar, this is roughly 700-800ml of water.
Add hydroponic nutrients at half the strength recommended on the product label. For Formulex, half strength is approximately 2.5ml per litre. For General Hydroponics Flora Series, follow the product chart and halve each value. Use a measuring syringe, the bottle cap, or a teaspoon for accuracy.
Stir the solution for 15-20 seconds to dissolve the nutrients completely. The water may change colour slightly (usually to a pale amber or green depending on the brand). This is normal.
Minute 5-7Test and adjust pH
Using your pH test drops, take a small sample of the nutrient solution in the provided test tube. Add 3 drops of indicator liquid, cap the tube, and shake gently. Compare the colour to the chart included in the kit.
You are aiming for a pH between 5.5 and 6.5. The ideal target is 5.8-6.0. UK tap water typically tests at pH 7.0-8.0, and adding nutrients usually brings it down to approximately 6.5-7.5. You will almost certainly need to add pH Down.
Add pH Down one drop at a time. Stir after each drop. Retest after every 2-3 drops. Approach the target gradually — it is much easier to lower pH in small steps than to overshoot and need pH Up to correct. Once your test shows a colour in the 5.5-6.5 range, you are done.
⚠️ The Golden pH Rule
Always add nutrients FIRST, then test pH. Nutrients change the pH of water significantly. If you test plain water, adjust to 6.0, then add nutrients, the pH will shift and you will need to readjust. Mix nutrients first, then test and adjust once.
Minute 7-9Plant the seedling
Rinse a handful of clay pebbles under running water to remove dust. Fill the net pot approximately one-third full with rinsed pebbles.
Gently lift your seedling from the paper towel. If the roots have grown into the paper towel, that is fine — you can place the entire piece of paper towel into the net pot. The paper towel will decompose naturally and causes no harm. If using rock wool, place the entire rock wool cube with the seedling into the net pot.
Position the seedling in the centre of the net pot, on top of the first layer of pebbles. The roots should point downward. Carefully add more clay pebbles around and over the seedling’s root area, filling the net pot to just below the rim. Leave the stem and leaves fully exposed above the pebbles. The pebbles should hold the seedling upright without crushing the delicate stem. Be gentle.
Minute 9-10Final assembly and positioning
Place the loaded net pot into the jar opening. The bottom of the net pot should be touching or sitting just barely above the nutrient solution surface. You should be able to see or feel that some solution is wicking up through the clay pebbles. If the solution level is too low to reach the net pot bottom, add a small amount of pH-adjusted nutrient solution until it does.
Place your completed kratky jar setup on your sunniest windowsill. South-facing windows are ideal in the UK, providing 6-8 hours of direct sunlight during spring and summer. East and west-facing windows work adequately, especially from April to September.
If your available light is limited (north-facing window, winter growing, or a room with small windows), add a clip-on LED grow light positioned 15-20 centimetres above the plant. Set a plug-in timer for 14-16 hours on, 8-10 hours off. A basic grow bulb costs £10-15 and fits any desk lamp.
Your kratky jar setup is now complete.
After setup: what to do (and what not to do)
| Week | What’s Happening | Your Job |
|---|---|---|
| Week 1-2 | Seedling establishing, slow top growth | Observe. Do nothing else. Check once for health. |
| Week 2-4 | Growth accelerating, water dropping, air gap forming | Check once weekly. Optional pH test. |
| Week 4-6 | Harvestable size, water significantly dropped | Harvest and enjoy. |
The critical mistake to avoid after your kratky jar setup
⚠️ Do Not Refill to the Original Level
This is the number one kratky killer. As the water drops, air roots develop in the gap. Refilling submerges these roots, suffocating them. The plant develops root rot and dies from too much water, not too little.
Only add water if roots are no longer touching the solution at all. Even then, add only a small amount of pH-adjusted water (no extra nutrients). Never bring the level back to where it started.
For a full list of kratky problems and solutions, see our kratky method troubleshooting guide.
After harvest: resetting for the next grow
Remove the old plant from the net pot. Pull out the spent roots and any decomposed paper towel. Rinse the clay pebbles under running water. Rinse the jar. Mix fresh nutrient solution, adjust pH, and transplant a new seedling. The jar, net pot, and clay pebbles are reusable indefinitely. Your next kratky jar setup takes even less than 10 minutes because you already know the process.
Start your next seedling germinating a week before you expect to harvest the current plant. This way, a new seedling is always ready to go into a freshly reset jar, maintaining your continuous supply of fresh food. For the best crops to rotate through your jars, see our best plants for kratky method ranked by success rate.
Frequently asked questions about kratky jar setup
Can I use any jar for my kratky setup?
Almost any container works as long as it has a wide enough opening for a 3-inch net pot to sit on the rim. Jam jars, coffee jars, large yoghurt pots, food storage containers, and even takeaway soup containers all work. The key requirements are: wide mouth, opaque or easily light-blocked, holds at least 500ml of liquid, and does not leak.
How long before I see root growth in my kratky jar?
Submerged roots typically appear within 5-10 days of transplanting. You will see small white roots pushing through the clay pebbles and down toward the water. By 2-3 weeks, roots should have clearly reached and entered the nutrient solution. If no root growth is visible after 14 days, check that light is not reaching the solution and pH is in the 5.5-6.5 range.
What size net pot should I use for a kratky jar?
For 1-litre mason jars, 3-inch net pots are the standard choice. They are widely available, well-priced, and fit most standard jar openings perfectly. For larger containers (2-5 litres), 4-5 inch net pots work better. Smaller net pots (2-inch) are available but limit the plant size you can grow.
Do I need to change the water during the grow cycle?
No. This is the entire point of the kratky method. You mix the solution once during setup and the plant drinks it over 4-6 weeks until harvest. The dropping water level is how the system is designed to work. If you change the water mid-grow, you disturb the root system and often trigger transplant shock.
Can I grow multiple plants in one kratky jar?
A single 1-litre jar is designed for one plant. For multi-plant setups, use larger containers (5-litre buckets or plastic storage tubs) and cut multiple holes in the lid for several net pots. This is sometimes called a “kratky tub” or “kratky bucket” and is a natural next step after mastering single-jar setups.
What happens if I forget to check my kratky jar for 2 weeks?
Usually nothing bad. The beauty of the kratky method is its tolerance for neglect. If the plant had sufficient water and the solution was properly mixed, 2 weeks of no attention typically causes no problems. The main risks during neglect are: the plant runs out of water (harvest early or add a small top-up), light starts reaching the solution (algae appears), or a pest arrives unnoticed (rare indoors).
Related posts you might find useful
- Kratky Method Hydroponics: Complete Guide — The background theory and science
- Kratky vs DWC: Which Passive System Is Better? — Compare kratky to its closest alternative
- Best Plants for Kratky Method Ranked — Which crops to grow in your new jar
- Kratky Method Troubleshooting Guide — Fix common problems
- Mason Jar Hydroponics for Beginners — Alternative beginner approach
- What Is Hydroponics? Plain English Explanation — Background reading
- Microgreens Hydroponics: First Harvest in 7 Days — Even faster results
Master the Kratky Method
Our 22-page ebook The Kratky Method: Hydroponics Without Electricity covers single jars, multi-plant tubs, nutrient schedules, a complete week-by-week calendar, troubleshooting, and advanced techniques.
✓ Week-by-week calendar · ✓ Multi-plant tub designs · ✓ Troubleshooting guide · ✓ Instant PDF download