
Microgreens hydroponics is the fastest path to growing your own food at home — quite literally. From sowing seeds to harvesting nutritious greens takes just 7-14 days, far faster than any other crop you can grow. There is no soil mess, no waiting weeks for results, and no expensive equipment required. A complete microgreens setup costs under £20 and produces edible greens within a week.
This guide walks you through every step of growing your first microgreens hydroponics tray, from buying seeds to that first satisfying harvest. By the end, you will know exactly how to grow nutrient-dense microgreens reliably in your own kitchen.
⚡ The 7-Day Promise
Microgreens hydroponics is the fastest crop you can grow at home. Most varieties go from seed to harvest in 7-14 days, with some quick varieties like radish microgreens ready in just 5-7 days. No other home growing method comes close to this speed.
What exactly are microgreens hydroponics?
Microgreens are the seedlings of vegetables and herbs harvested at the cotyledon or first-true-leaf stage, usually 1-3 inches tall. They are not sprouts (which are eaten with the seed and root attached) and they are not baby greens (which are larger and older). Microgreens occupy a sweet spot of intense flavour, packed nutrition, and fast growing time that makes them ideal for hydroponic methods.
Microgreens hydroponics replaces soil with growing mats, paper towels, or coconut coir wetted with plain water or very dilute nutrients. According to research published by the USDA, microgreens contain 4-40 times more nutrients per gram than their fully mature counterparts, making them one of the most nutrient-dense foods you can grow at home.
Why does microgreens hydroponics work so much better than soil?
Traditional soil-grown microgreens have several frustrating problems: soil mess on kitchen counters, fungus gnats from compost, inconsistent moisture, and difficulty harvesting clean greens without dirt. Microgreens hydroponics solves every one of these issues simultaneously.
| Factor | Soil Method | Hydroponic Method |
|---|---|---|
| Mess level | High — soil everywhere | None — clean kitchen |
| Pests | Fungus gnats common | Virtually none |
| Harvest cleanliness | Soil grit on greens | Perfectly clean |
| Setup cost | £15-25 | £10-20 |
| Beginner success rate | ~70% | ~95% |
What do you need to grow microgreens hydroponics at home?
The complete shopping list for your first microgreens hydroponics setup costs £10-20 and includes only basic, easily-sourced items. Most are reusable for years.
🛒 Complete Shopping List
| Shallow growing trays (1020) From any garden centre |
£3-5 |
| Hemp or coir growing mats Pre-cut to fit standard trays |
£5-8 |
| Microgreens seeds Bulk packs or garden centres |
£3-8 |
| Spray bottle For misting during germination |
£2-3 |
| Sharp scissors For clean harvest cuts |
£3-5 |
| Total Cost | £16-29 |
After this initial investment, ongoing costs drop to just £2-5 per tray for new growing mats and seeds.
Do you actually need hydroponic nutrients for microgreens?
No, and this is one of the great advantages of microgreens hydroponics. Because microgreens are harvested before their first true leaves develop, they get all their nutrition from the seed itself. You can grow excellent microgreens with plain tap water and never need to mix nutrients. This makes microgreens significantly easier than other hydroponic crops for absolute beginners.
Which are the 5 best microgreens for beginners?
Some microgreens are dramatically easier to grow than others. These five varieties are the best starting points because they germinate reliably, grow quickly, and tolerate beginner mistakes.
| Variety | Days to Harvest | Flavour | Difficulty |
|---|---|---|---|
| Radish | 5-7 days | Spicy, peppery | ⭐ Easiest |
| Sunflower | 8-12 days | Nutty, crunchy | ⭐⭐ Easy |
| Pea shoots | 10-14 days | Sweet, fresh | ⭐⭐ Easy |
| Broccoli | 7-10 days | Mild, slightly cabbagey | ⭐⭐ Easy |
| Mustard | 7-10 days | Hot, mustardy kick | ⭐ Easiest |
For your very first microgreens hydroponics tray, choose radish — it germinates within 24-48 hours, grows uniformly, and rewards you with the fastest harvest of any home-grown food crop. For a complete breakdown of the top varieties with yields and flavour profiles, see our 10 best microgreen varieties for hydroponic beginners.
How do you actually grow microgreens hydroponics step by step?
The complete process from sowing to harvest takes 7-14 days depending on variety. Each individual step takes just minutes to perform.
Day 1Sowing your seeds
- Soak the growing mat in plain tap water for 5 minutes, then squeeze out excess water
- Place the wet mat in your shallow tray, ensuring it covers the entire base
- Sprinkle seeds evenly across the mat surface — aim for dense coverage but not piled
- Mist with water using your spray bottle until seeds are slightly damp
- Cover the tray with another inverted tray to create darkness and humidity
Days 2-3Germination phase
Keep the tray covered in a warm spot (18-22°C). Check daily and mist if the mat starts to dry. Within 24-72 hours depending on variety, you will see tiny white roots emerging followed by pale stems pushing upward.
Days 4-7Growing into the light
Once stems are 1-2cm tall and pushing against the cover, remove the cover and move the tray to a bright location. Natural windowsill light works well, or use a basic LED grow light. The pale yellow stems quickly turn green as they photosynthesise.
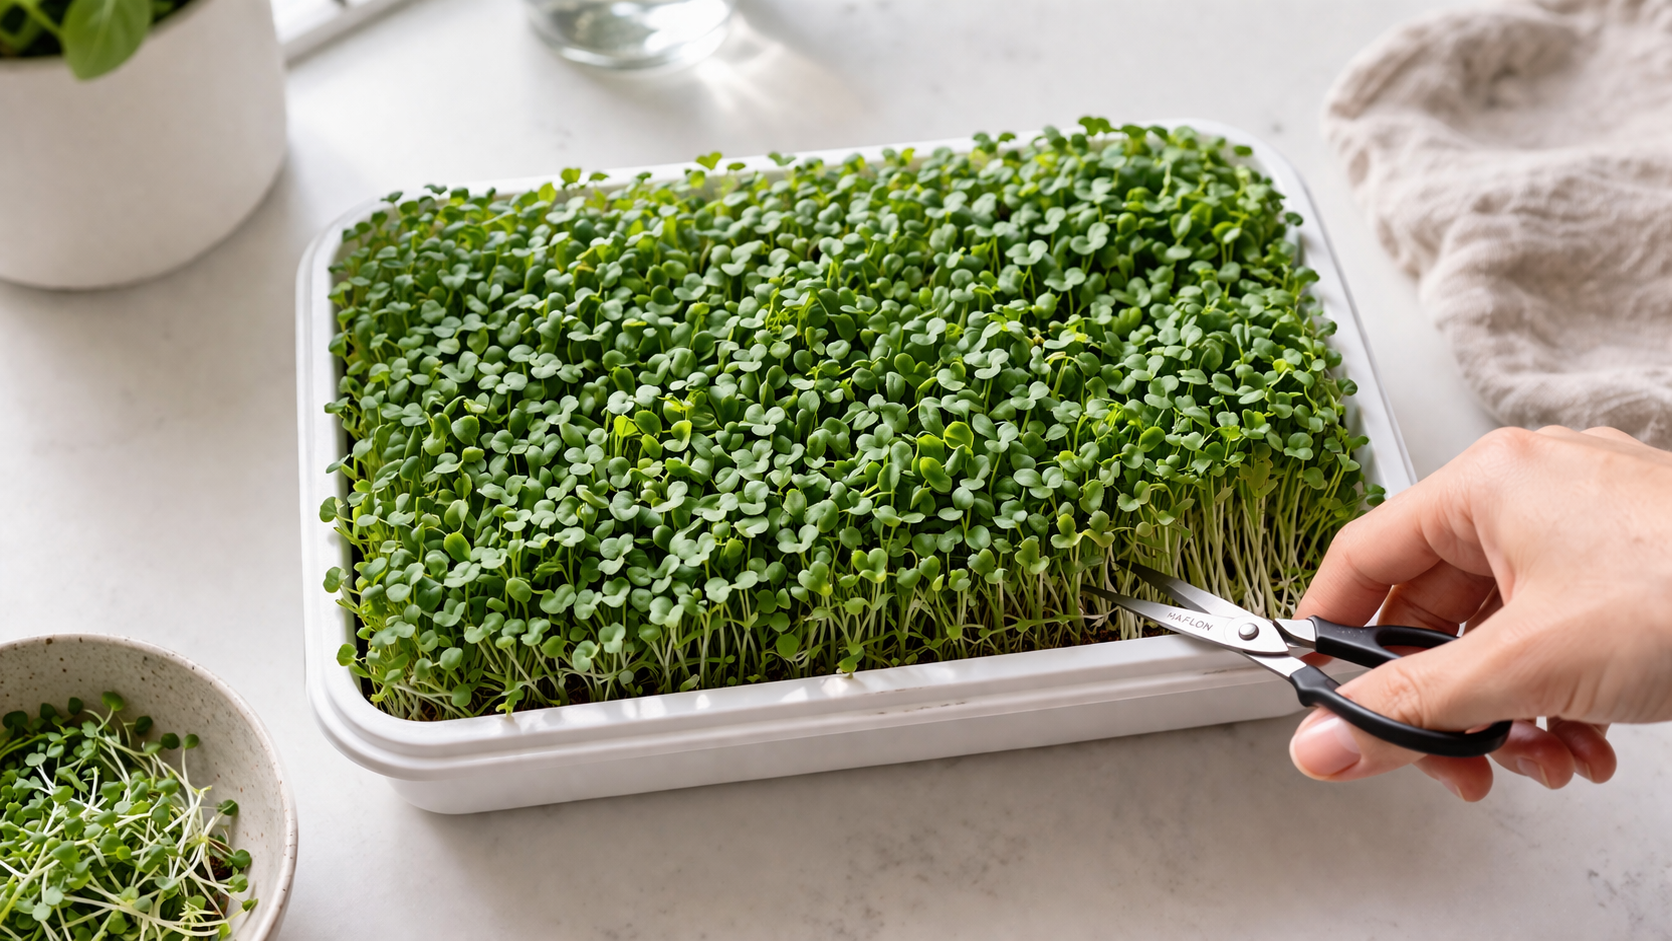
Days 7-14Harvest day
When microgreens reach 1-3 inches tall and have their first true leaves emerging, they are ready to harvest. Use sharp scissors to cut just above the mat surface. Rinse gently, pat dry, and enjoy immediately or store in the fridge for up to a week.
Intermediate level: scaling up your microgreens hydroponics
Once you have mastered your first microgreens hydroponics tray, several techniques significantly improve your output and consistency.
Stagger trays for continuous harvests
Start a new tray every 2-3 days. Within two weeks, you have trays at every growth stage and can harvest fresh microgreens almost daily. This is how commercial microgreen growers maintain continuous supply, and it works equally well at home scale.
Use grow lights for consistent results
While natural windowsill light works for microgreens, a basic LED grow light (£15-25) produces more uniform, vibrant microgreens regardless of weather or season. The light only needs to run for the final 4-7 days after germination.
Try different growing mediums
Beyond the standard hemp mats, experiment with coconut coir, paper towels, or even just damp cotton wool for your microgreens hydroponics. Each medium has slightly different water retention and root behaviour. Hemp mats remain the easiest for beginners.
What next? Going beyond basic microgreens hydroponics
After mastering basic microgreens hydroponics, here are the natural next steps for committed growers:
- Experiment with unusual varieties like beetroot, cabbage, kohlrabi, and amaranth — see our 10 best microgreen varieties ranked for detailed comparisons
- Build a multi-tier shelf system for growing 6-12 trays simultaneously
- Start selling locally with our microgreens business from home guide or farmers market selling tips
- Compare with full-size growing in our microgreens vs full size plants guide
- Teach the concept to children — microgreens are perfect for teaching kids hydroponics because results come fast
- Connect with the microgreen community through resources like Epic Gardening for advanced techniques
Frequently asked questions about microgreens hydroponics
How nutritious are microgreens compared to mature vegetables?
Microgreens are dramatically more nutrient-dense than fully mature vegetables. Research from the USDA shows microgreens contain 4-40 times more vitamins, minerals, and antioxidants per gram than mature plants. This makes them one of the most nutritionally efficient foods you can grow at home.
How long do harvested microgreens last in the fridge?
Fresh microgreens stored in a sealed container with a paper towel in the fridge last 5-10 days. They taste best within the first 3 days of harvest. For maximum freshness, harvest only what you need each day rather than cutting an entire tray at once.
Can I reuse the growing mats after harvest?
No, microgreens hydroponics mats should be composted after a single use. Reusing mats risks contamination from leftover root material and significantly reduces germination rates for the next batch. Fresh mats cost just 50p-£1 each.
Why are my microgreens falling over?
Microgreens falling over (also called “lodging”) usually indicates one of three problems: too much water (mat is soggy), insufficient light (stems grew too tall searching for light), or harvest delayed too long (plants outgrew their support structure). Reduce watering, add light, and harvest at the right time.
Do microgreens regrow after cutting?
Most microgreens do not regrow after cutting because they are harvested before developing the food reserves needed for regrowth. Pea shoots are an exception — they often produce a small second harvest. For all other varieties, treat each tray as a single-harvest crop and start fresh for the next batch.
Can I grow microgreens from regular vegetable seeds?
Yes, microgreens hydroponics works with regular vegetable seeds, but seeds specifically labelled for microgreens are typically untreated, tested for high germination rates, and sold in larger quantities at lower per-gram cost. Check garden centres or online seed retailers for quality microgreen seed varieties.
Related posts you might find useful
- 10 Best Microgreen Varieties for Hydroponic Beginners — Detailed ranking of top varieties
- Microgreens vs Full Size Plants — Which should beginners grow first?
- Microgreens Business from Home: Complete Startup Guide — Turn your hobby into income
- Selling Microgreens at Farmers Markets — 7 proven tips for success
- Fastest Hydroponic Crops: Top 8 Plants Under 30 Days — Compare microgreens to other quick crops
- 10 Easy Hydroponic Plants Almost Impossible to Kill — Easy crops beyond microgreens
- What Is Hydroponics? A Plain-English Explanation — Background reading if new to soilless growing
Turn Microgreens Into a Side Income
Our 23-page ebook Microgreens: Hobby to Side Income includes detailed grow guides for 20+ varieties, complete business startup plan, pricing strategies, and everything you need to sell to restaurants and farmers markets.
✓ 20+ variety grow guides · ✓ Pricing strategies · ✓ Restaurant pitch scripts · ✓ Instant PDF download