
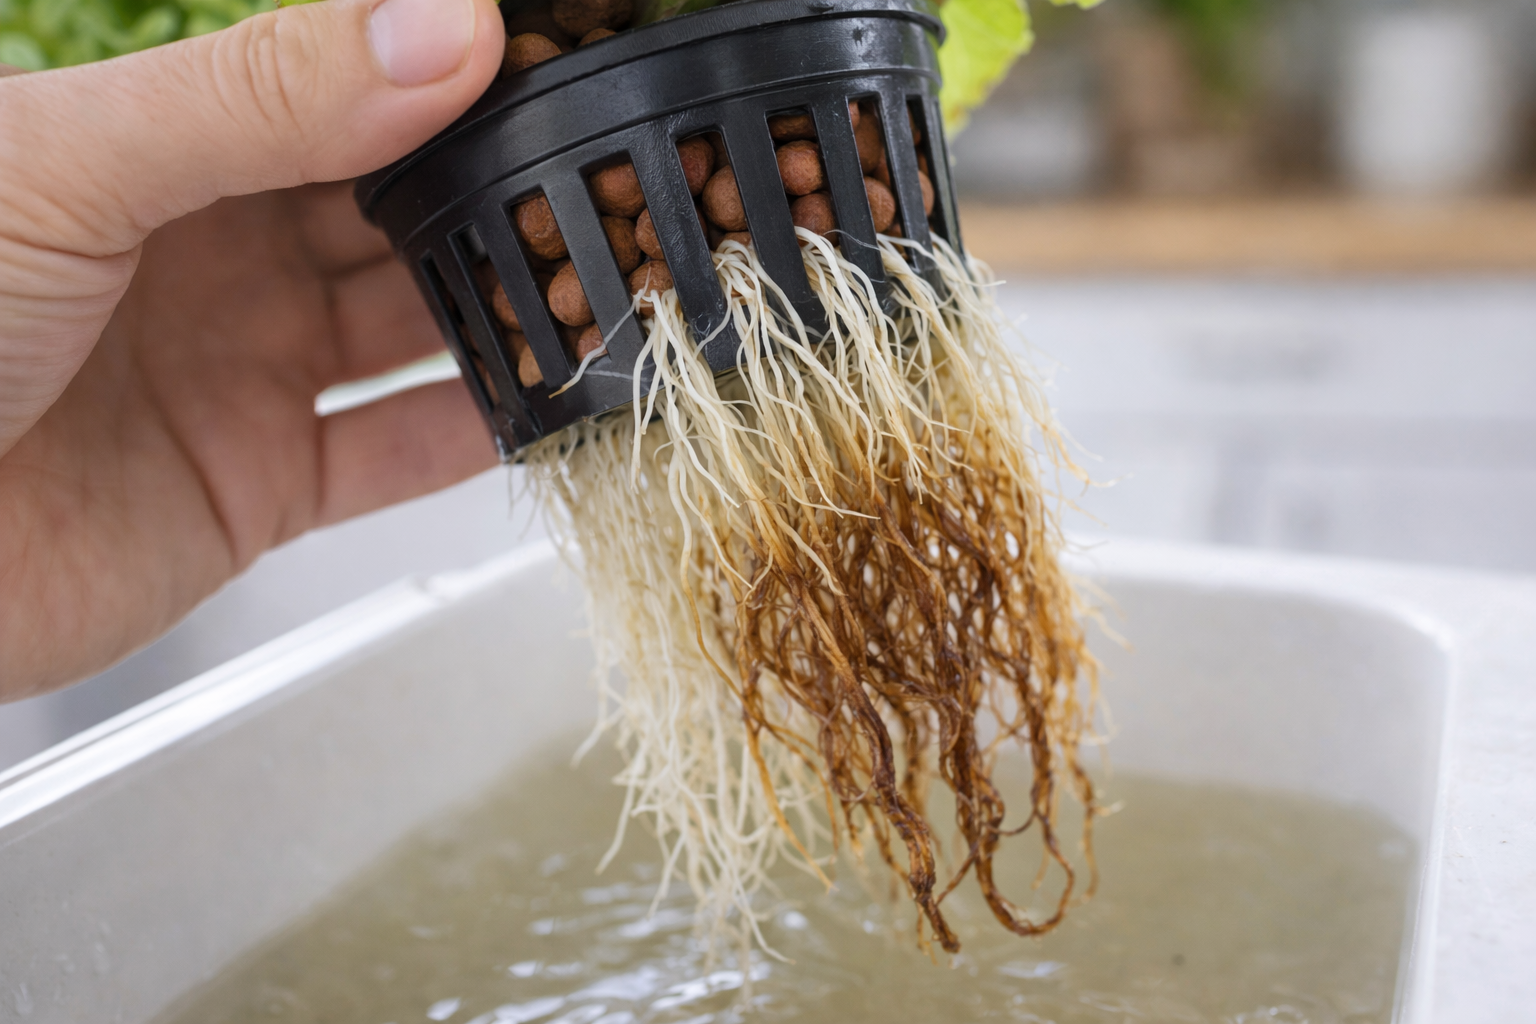
Hydroponic root rot is the most serious problem a hydroponic grower can face. While yellow leaves, algae, and pH drift are nuisances that slow growth, hydroponic root rot can kill a plant within days if left untreated. The roots literally decompose in the water, losing their ability to absorb nutrients and oxygen until the plant collapses.
The good news is that hydroponic root rot is almost entirely preventable, and if caught early, most plants can be saved. This guide teaches you to spot it before it becomes fatal, fix it when it occurs, and prevent it from ever coming back.
⚠️ Time-Sensitive Problem
Root rot can kill a plant within 3-5 days if left untreated. Caught in the early stage (some roots still white), most plants fully recover. Caught when all roots are brown, most plants are beyond saving. Speed of diagnosis matters more than anything else — when in doubt, inspect your roots today.
What is hydroponic root rot?
Hydroponic root rot is a condition where the roots of a plant become infected by anaerobic bacteria and water moulds (primarily Pythium species). These organisms thrive in warm, low-oxygen environments — exactly the conditions that develop when hydroponic roots are submerged in stagnant, poorly oxygenated water.
Healthy hydroponic roots are white or cream-coloured, firm to the touch, and have a slight earthy smell. Roots affected by hydroponic root rot turn progressively brown, become slimy and mushy, and develop an unpleasant rotten smell. As the infection progresses, the roots lose their ability to function, and the plant wilts, yellows, and eventually dies.
In nature, soil contains billions of beneficial microorganisms that compete with and suppress pathogenic fungi and bacteria. In hydroponics, the sterile water environment has fewer of these natural competitors, which means pathogenic organisms can proliferate rapidly once conditions favour them.
How to identify hydroponic root rot
Root rot progresses through three distinct stages. Identifying which stage you’re in determines whether the plant can be saved and how aggressive your treatment needs to be.
✓ Early signs (plant can still be saved)
- Roots at the bottom of the reservoir are turning light brown while upper roots remain white
- A slight musty or sour smell when you lift the lid or net pot
- The plant is growing more slowly than expected but otherwise looks healthy above the surface
- The nutrient solution appears slightly cloudy or has developed a tan tinge
⚠️ Moderate signs (act immediately)
- Most roots are brown and feel slimy when touched
- The plant is visibly wilting despite water being present in the reservoir
- Lower leaves are yellowing and may be dropping off
- A strong unpleasant smell from the root zone
- Brown or tan slime visible on the container walls at the waterline
🚨 Severe signs (plant may not be recoverable)
- All roots are dark brown or black, mushy, and fall apart when touched
- The entire plant is wilted, yellow, and drooping
- The root mass has partially dissolved — there is less root material than there should be
- Strong rotting smell
What causes hydroponic root rot
Cause 1Low dissolved oxygen (primary cause)
This is the primary cause of hydroponic root rot. Roots need oxygen to function, and when dissolved oxygen levels drop too low, the beneficial aerobic bacteria that protect roots die off while harmful anaerobic bacteria (which thrive without oxygen) multiply rapidly.
Low oxygen occurs when: the air pump fails or is too weak in a DWC system, a Kratky jar is refilled to the top (eliminating the air gap), water is stagnant with no circulation or aeration, or the root mass has grown so dense that water cannot circulate between roots.
Cause 2High water temperature
Warm water holds less dissolved oxygen than cool water. The relationship is dramatic:
| Water Temperature | Dissolved Oxygen | Root Rot Risk |
|---|---|---|
| 18°C | ~9.5 mg/L | Low |
| 22°C | ~8.7 mg/L | Moderate |
| 26°C | ~8.0 mg/L | High |
| 30°C | ~7.5 mg/L | Very high |
Additionally, Pythium and other water moulds reproduce faster in warm water. The combination of less oxygen and more pathogens makes summer and warm indoor environments the highest-risk periods for hydroponic root rot.
Cause 3Light reaching the nutrient solution
Light promotes the growth of algae and certain microorganisms in the nutrient solution. While algae itself does not directly cause hydroponic root rot, algae blooms consume oxygen as they decompose, reducing dissolved oxygen levels and creating conditions that favour rot-causing organisms. For the complete algae prevention approach, see our algae in hydroponic system guide.
Cause 4Contaminated equipment
Reusing containers, net pots, clay pebbles, and tubing without proper cleaning between grows can introduce hydroponic root rot pathogens to a new plant. A single surviving colony of Pythium on an unwashed container can infect an entire new crop.
How to fix hydroponic root rot (step by step)
If caught early (some roots still white)
Step 1Remove the plant from the system
Lift the net pot out carefully. Have a bowl of clean, pH-adjusted water ready to set the plant in while you work on the container.
Step 2Inspect and trim the roots
Using clean scissors, cut away all brown, slimy, and mushy root material. Be aggressive — remove anything that does not look healthy white. It is better to lose 50 percent of the root mass than to leave infected tissue attached.
Step 3Rinse the remaining roots
Hold the healthy roots under cool running water for 30 seconds to wash away any remaining bacteria and slime. Do not use hot water — it can shock the roots further.
Step 4Treat the roots with hydrogen peroxide
Soak them for 10 minutes in a dilute hydrogen peroxide solution: 3ml of 3% hydrogen peroxide per litre of clean water. This kills remaining anaerobic bacteria without harming the plant.
Step 5Drain and sterilise the container
Empty the old nutrient solution completely — do not save it. Wash the container with the same hydrogen peroxide solution. Rinse thoroughly with clean water. This same process works for net pots and clay pebbles.
Step 6Mix fresh nutrient solution
Prepare fresh nutrients at the appropriate strength. Adjust pH to 5.5-6.5. If you’re worried about your pH stability, see our pH keeps dropping in hydroponics guide.
Step 7Add beneficial bacteria (recommended)
Products like Hydroguard or Great White Mycorrhizae introduce beneficial microorganisms that compete with pathogens and protect roots. These cost £8-15 and are highly recommended after a root rot episode. Add them 24 hours after the hydrogen peroxide treatment (peroxide kills good bacteria too).
Step 8Return the plant and monitor closely
Place the plant back in the clean system. Ensure the air pump is working correctly (DWC) or that a proper air gap exists (Kratky). Monitor closely for the next 2 weeks — lift the net pot and check roots every 3-4 days until you see new white growth.
If severe (all roots brown)
Unfortunately, if every root is brown and mushy with no healthy white tissue remaining, the plant is almost certainly beyond saving. Your best course of action is to remove and discard the plant, thoroughly sterilise the container and all equipment with hydrogen peroxide or a dilute bleach solution (1 tablespoon bleach per litre of water, followed by thorough rinsing), and start fresh with a new seedling and fresh nutrient solution.
The lesson from a severe hydroponic root rot episode is not failure — it is experience. You now know what the early signs look like and can catch it before it reaches this stage in future grows.
How to prevent hydroponic root rot permanently
Prevention 1Maintain adequate dissolved oxygen
In DWC systems, use an air pump rated for your container size. A general rule is 1 litre of air per minute per 4 litres of nutrient solution. If in doubt, use a slightly oversized pump — more oxygen is always better than less. Check that the air stone is producing a steady stream of fine bubbles. Replace air stones every 3-6 months as they clog with mineral deposits.
In Kratky systems, never refill the container to the original level. The air gap is your oxygen source. Protecting it is the single most important thing you can do to prevent hydroponic root rot in passive systems. See our kratky method troubleshooting guide for more on air gap management.
Prevention 2Keep water temperature below 24°C
Place your hydroponic system away from radiators, south-facing windows in summer, and other heat sources. If you live in a warm climate or grow during summer, consider adding a frozen water bottle to the reservoir daily to bring the temperature down. Some growers use aquarium chillers (£40-80) for larger systems, but this is rarely necessary for small home setups.
A simple aquarium thermometer (£2-3) stuck to the inside of your container lets you monitor water temperature at a glance.
Prevention 3Block all light from the reservoir
Use opaque containers or wrap transparent ones completely in aluminium foil. Seal any gaps around net pots where light could enter from above. This prevents algae growth, which indirectly reduces hydroponic root rot risk by maintaining higher dissolved oxygen levels.
Prevention 4Clean equipment between grows
After each harvest, wash all containers, net pots, and clay pebbles with hydrogen peroxide solution or a dilute bleach solution. Rinse thoroughly with clean water before reuse. This eliminates any lingering pathogens from the previous grow. Clay pebbles can also be baked in an oven at 200°C for 30 minutes to sterilise them completely.
Prevention 5Use beneficial bacteria
Products like Hydroguard contain Bacillus amyloliquefaciens, a beneficial bacterium that colonises root surfaces and outcompetes harmful organisms. Adding it to your nutrient solution when you first set up the system creates a protective biological barrier around the roots. This is the closest thing to a hydroponic root rot vaccine available to home growers.
Can I use hydrogen peroxide to treat hydroponic root rot?
Yes, but with important caveats. Hydrogen peroxide (H2O2) is an effective treatment for hydroponic root rot because it releases oxygen as it decomposes, killing anaerobic bacteria on contact. However, it also kills beneficial bacteria, so it should be used as a rescue treatment rather than a routine additive.
The recommended concentration for treatment is 3ml of 3% hydrogen peroxide per litre of nutrient solution. This is strong enough to kill pathogens but mild enough to avoid damaging roots. Higher concentrations risk burning the roots and making the problem worse.
After using hydrogen peroxide, wait 24 hours and then add a beneficial bacteria product like Hydroguard to re-establish a healthy microbial population around the roots.
Root rot recovery timeline
If you catch hydroponic root rot early and follow the treatment steps above, here is a typical recovery timeline:
| Timeline | What’s Happening | What You Should See |
|---|---|---|
| Days 1-3 | Plant still stressed from trauma | No visible improvement. This is normal — don’t panic. |
| Days 3-7 | Root regeneration beginning | New white root tips from the cut ends. Deterioration has stopped. |
| Days 7-14 | Active recovery phase | New root growth visible. Plant begins to perk up and resume top growth. |
| Days 14-21 | Rebuilding complete | Root system rebuilt significantly. Normal growth resumes. |
If you see no new white root growth after 7 days, the infection may still be active. Repeat the hydrogen peroxide treatment and reassess.
Frequently asked questions about hydroponic root rot
Can root rot spread from one plant to another in separate systems?
Yes, via shared tools, hands, splashed water, and reused equipment. When treating one system for root rot, wash your hands and tools before touching other systems. Never move water between systems. Keep any infected plant’s equipment isolated until it’s been properly sterilised.
Is brown root colour always root rot?
No. Slightly tan or cream-coloured roots can be normal, especially if you’ve been using nutrients that tint the water (some formulations turn roots slightly beige). The key test is texture and smell — healthy roots are firm and smell earthy, rotting roots are slimy and smell foul. Colour alone isn’t enough to diagnose.
Can I prevent root rot by using less water?
No, and trying to do so often causes the opposite problem. Hydroponic plants need consistent access to water and nutrients — restricting water just stresses the plant without preventing rot. The correct approach is maintaining good water quality (oxygen levels, temperature, cleanliness), not reducing water volume.
Why do some of my roots look brown but the plant seems healthy?
If the brown is only on the oldest, deepest roots (submerged at the bottom of the reservoir) while newer roots above are white, this is typically early-stage rot that’s been contained by the plant’s own defences. Treat it anyway using the steps above — left alone, it will spread. Early intervention is always easier than late treatment.
Does adding nutrients cause root rot?
No, nutrients themselves don’t cause root rot. However, nutrients grow algae (which deplete oxygen) if light reaches the solution. And high nutrient concentration in warm water creates ideal conditions for pathogenic bacteria to multiply. Root rot is really about the environment (oxygen, temperature, light) rather than the nutrients themselves.
Should I quarantine a plant recovering from root rot?
If you have multiple systems running, yes — isolate the recovering plant for at least 2-3 weeks. Even after visible recovery, low-level pathogen populations can persist and spread via shared equipment. Once you see strong new white root growth and the plant is clearly thriving, you can return to normal practices.
Related posts you might find useful
- Hydroponic Plants Turning Yellow — Yellowing often signals early root rot
- Algae in Hydroponic System: Complete Guide — Algae creates root rot conditions
- pH Keeps Dropping in Hydroponics — Bacterial activity from root rot causes pH drift
- Hydroponic Nutrient Deficiency Chart — Damaged roots can’t absorb nutrients properly
- Hydroponic Nutrient Burn — Distinguish rot symptoms from burn
- Kratky Method Troubleshooting — Kratky-specific root rot scenarios
- Kratky vs DWC: Which Passive System Is Better? — Oxygen comparison between systems
Diagnose Every Hydroponic Problem
Our 22-page ebook Hydroponic Troubleshooting Guide covers root rot, nutrient deficiencies, pH problems, algae, pests, and every common issue with visual symptom charts and step-by-step fixes.
✓ Visual symptom charts · ✓ Recovery timelines · ✓ Prevention checklists · ✓ Instant PDF download