
You do not need to spend hundreds of pounds on a cheap hydroponic system DIY project. A fully functional Deep Water Culture setup costs under £30 using materials from a hardware shop and Amazon UK. This system grows lettuce, herbs, and small vegetables just as effectively as commercial systems costing five times the price.
DWC is the same method used by commercial hydroponic farms worldwide. The only difference between their operation and yours is scale. The principles are identical: oxygenated nutrient solution feeding submerged roots. Whether you spend £30 or £3,000, the chemistry is the same and the plants cannot tell the difference.
Follow this guide exactly and you will have a working hydroponic garden producing food by the end of the month.
🪣 What You’ll Build
A single-bucket Deep Water Culture (DWC) system for £25-35 total. Grows one large plant (cherry tomato, pepper) or 3-4 small plants (lettuce, herbs) continuously. Takes 30 minutes to build, 5 minutes weekly to maintain.
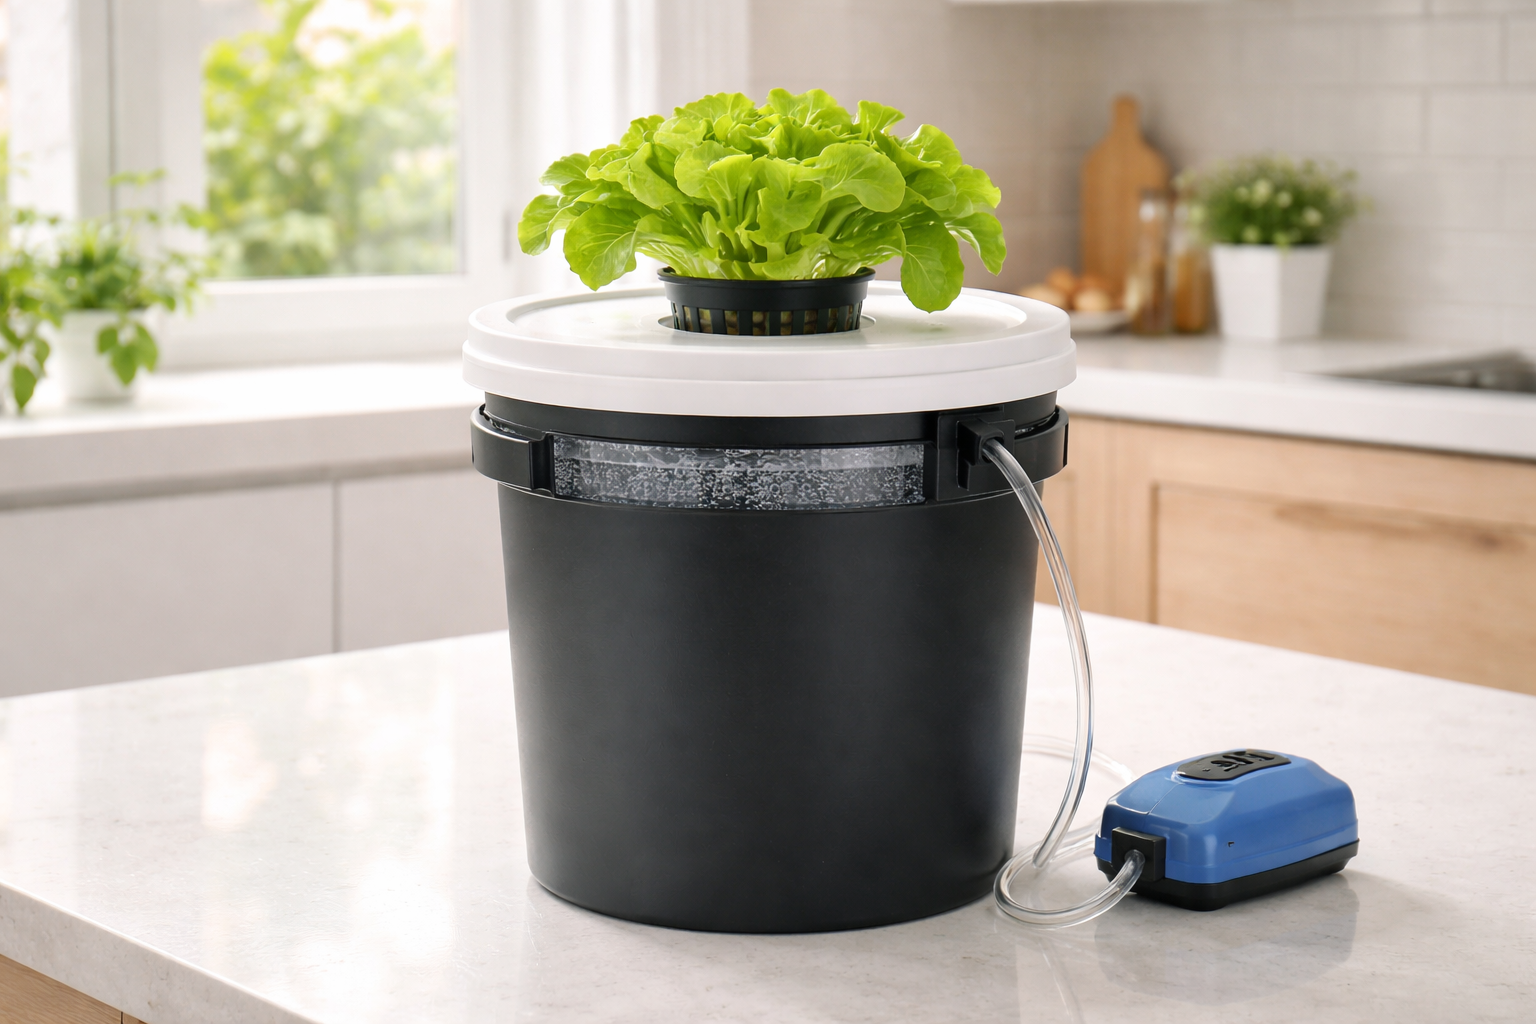
What you are building
A single-bucket DWC system. One 5-gallon bucket (approximately 20 litres) holds nutrient solution. An air pump pushes oxygen through an air stone at the bottom, creating a constant stream of bubbles that keeps the roots aerated and healthy. A net pot sits in a hole cut in the lid, holding your plant above the water while its roots dangle into the oxygenated solution below.
This system can grow one large plant (like a cherry tomato or pepper) or a cluster of 3 to 4 smaller plants (lettuce, herbs). It runs continuously on a tiny air pump that costs pennies per month in electricity. There is one moving part, one measurement to monitor, and one weekly task. Everything else happens automatically inside the bucket. For the passive Kratky alternative (no pump needed), see our Kratky vs DWC comparison.
Complete shopping list with exact UK prices
🛒 Complete Build Shopping List
| 5-gallon bucket with lid B&Q, Wilko, Screwfix, or any UK hardware shop (dark colours prevent algae) |
£3-5 |
| Net pot (3-inch for herbs, 6-inch for larger plants) Amazon UK 10-pack for best value |
£0.50-2 |
| Air pump (small aquarium pump, 2-4 L/min) Amazon UK or UK pet shops — Hidom, AllPondSolutions, Tetra |
£5-12 |
| Air stone (4-inch cylinder or disc) Amazon UK or pet shops (cylinder distributes bubbles more evenly) |
£2-4 |
| Airline tubing (1 metre) Usually included with the air pump |
£1-2 |
| Clay pebbles (LECA, small bag) Amazon UK or garden centre |
£3-5 |
| Hydroponic nutrients Formulex (UK brand) or General Hydroponics Flora Series |
£8-12 |
| pH test drops General Hydroponics pH Test Kit, 200+ tests |
£4-6 |
| pH Down solution Essential — UK tap water typically pH 7.0-8.0 |
£3-5 |
| Seeds Suttons, Thompson & Morgan, Tesco, Sainsbury’s |
£1-2 |
| Total Initial Investment | £25-35 |
The nutrients, pH drops, and pH Down last for 6 to 12 months across dozens of grows. Your cost per subsequent grow drops to just £1-3 for seeds and growing medium.
The 6-step build process
Step 1Cut the net pot hole in the lid
Place your net pot upside down on the centre of the bucket lid. Trace around the outside with a marker pen. You want the hole to be slightly smaller than the net pot lip so the pot sits snugly without falling through. The lip rests on the lid surface while the bottom hangs down into the bucket.
If you have a drill with a hole saw bit, cut the hole cleanly. A 3-inch hole saw matches a standard 3-inch net pot perfectly. Without a drill, use a sharp knife to carefully cut along the traced line. Take your time because a clean hole means a stable net pot that will not wobble or tip.
After cutting, clean up rough edges with scissors or sandpaper. Test the fit by inserting the net pot. It should sit firmly with the lip resting flat on the lid. The bottom should hang 3 to 5 centimetres below. If you want multiple smaller plants, cut 2-3 holes spaced at least 10 centimetres apart.
Step 2Set up the air system
The air system is what makes DWC faster and more productive than passive Kratky growing. By continuously pumping oxygen into the nutrient solution, you ensure the roots never run short of the oxygen they need for healthy growth and nutrient absorption.
Connect one end of the airline tubing to the air pump outlet. Connect the other end to the air stone. Drop the air stone to the very bottom of the bucket so bubbles rise through the entire water column. Thread the tubing out through a small gap between the lid and bucket rim, or drill a small hole near the top of the bucket just wide enough for the tubing.
⚠️ Critical Placement Rule
Always position the air pump above the water level. If the pump is below the bucket and loses power during an outage, water can siphon back through the tubing and destroy the pump. Place it on a shelf, table, or windowsill above the bucket. This one precaution saves you from the most common DWC equipment failure.
Plug in the pump and test before adding nutrients. You should see a steady stream of bubbles. If bubbling is weak, check that connections are tight and the airline is not kinked anywhere along its length.
Step 3Mix the nutrient solution
Fill the bucket with room-temperature water to approximately 3 centimetres below where the net pot will hang when the lid is on. For a standard 5-gallon bucket, this is roughly 15 to 18 litres.
If your tap water smells strongly of chlorine, let it sit uncovered for 24 hours before proceeding. Chlorine dissipates naturally into the air. Alternatively, add dechlorinator drops from any aquarium shop (£2-3) which neutralise chlorine instantly. For UK water specifics, see our tap water for hydroponics guide.
Add your hydroponic nutrients following the product instructions. For General Hydroponics Flora Series, this means adding specific amounts of Micro, Grow, and Bloom per litre. For your first grow, use half the recommended concentration. Half-strength nutrients grow perfectly healthy plants with a much larger margin for error, and you avoid the risk of nutrient burn that catches many beginners.
Stir thoroughly for 30 seconds until all nutrients are completely dissolved. Undissolved nutrients at the bottom cause pH fluctuations later as they slowly dissolve into the solution. For the complete mixing process, see our hydroponic nutrients for beginners guide.
Step 4Test and adjust pH
This is the single most important step. Incorrect pH causes more hydroponic failures than any other factor, and it is also the easiest problem to prevent.
Take a small sample with your pH test kit. Add the indicator drops, shake gently, and compare the colour to the chart. You want pH between 5.5 and 6.5, with 5.8-6.0 being the sweet spot for most crops.
UK tap water typically starts at pH 7.0-8.0. Adding nutrients brings it down somewhat, but you will almost certainly need to add pH Down. Add one drop at a time, stir between drops, and retest after every 2-3 drops. Gradual adjustment is easier than overshooting and having to raise it again. See our how to adjust pH guide for more detail.
🔑 The Golden Rule
Always add nutrients BEFORE testing pH. Nutrients change the water pH significantly. Mix first, then test and adjust once. This saves time and gives accurate results.
Step 5Plant your seedling
You should have germinated seeds 7-10 days earlier on a damp paper towel or in a rock wool cube. The seedling needs its first set of true leaves before transplanting. True leaves are the second pair that appear after the initial round seed leaves.
Fill the net pot one-third full with rinsed clay pebbles. Gently place the seedling with its paper towel or rock wool into the centre. Add more pebbles around and over the roots, leaving the stem and leaves exposed. The pebbles support the seedling upright without crushing the delicate stem.
Place the net pot into the lid, snap the lid onto the bucket. The net pot bottom should touch or nearly touch the nutrient solution. Some solution wicks up through the pebbles, keeping the young roots moist while they grow downward into the reservoir.
Step 6Position and start growing
Place your cheap hydroponic system DIY build in a bright location. South-facing windowsills are ideal in the UK, providing 6-8 hours of direct sunlight in summer. East and west-facing windows work too, especially from April to September.
If natural light is limited, add a clip-on LED grow light (£10-15) positioned 15-20 centimetres above the plant. Set a plug-in timer (£5-8 from Argos or B&Q) for 14-16 hours on, 8-10 hours off. This provides consistent, reliable light regardless of weather or season. See our best grow lights under £100 guide for specific recommendations.
Turn on the air pump and leave it running 24/7. Roots need oxygen around the clock, not just during daylight hours. The electricity cost is negligible — typically less than £1 per month.
Weekly maintenance routine (5 minutes)
Every 2-3 days, check three things. Every 1-2 weeks, drain and refresh the entire reservoir.
| Check | Frequency | What to Do |
|---|---|---|
| Water level | Every 2-3 days | Top up with plain, pH-adjusted water if it drops more than 5cm. No nutrients added — just pH-adjusted water |
| pH reading | Every 2-3 days | Test and adjust if drifted above 6.5. A slight upward drift is normal as plants absorb nutrients |
| Plant health | Every 2-3 days | Green and growing = fine. Yellowing = pH issues. Brown crispy tips = nutrient burn (dilute) |
| Full reservoir refresh | Every 1-2 weeks | Drain entire bucket and replace with freshly mixed nutrient solution |
| Air pump check | Weekly | Visually confirm steady bubble stream. Replace air stone if bubbles weaken (£2-4) |
Best first crops for DWC
Start with one of these forgiving, fast-growing crops:
#1Butter lettuce — Most forgiving
Ready in 30-45 days. The most forgiving crop for beginners. Tolerates minor pH fluctuations and nutrient variations gracefully. Butter varieties like Buttercrunch or Tom Thumb work particularly well. See our hydroponic lettuce week-by-week guide for the complete schedule.
#2Basil — Best flavour reward
Ready in 21-28 days. Grows vigorously in DWC. Pinch off flower buds to maintain leaf production. One plant produces more basil than most families can use. See our hydroponic herbs guide for the full basil approach.
#3Mint — Nearly unkillable
Ready in 30-40 days. Virtually impossible to kill. Grows so aggressively it may need trimming to keep it from overwhelming the net pot. Can be started from a Tesco or Sainsbury’s fresh mint cutting rather than seeds.
Scaling up
Once your first bucket is thriving, adding more is cheap and simple. Each additional bucket costs only £5-10 (bucket, net pot, air stone, and pebbles — you already have nutrients and pH supplies). A dual-output air pump runs two buckets from one unit. Three DWC buckets on a kitchen shelf produce enough herbs and lettuce to make a real dent in your weekly shopping.
The skills you build with this first £30 system transfer directly to every hydroponic method. Once you understand nutrients, pH, and plant observation, you can confidently try NFT channels, vertical towers, or even a full growing room. But it all starts with one bucket.
Frequently asked questions about the £30 DWC system
Does the air pump need to run 24/7?
Yes. Roots need oxygen around the clock — they don’t stop respiring at night. The electricity cost of running a small aquarium air pump continuously is about £0.50-£1 per month. Turning it off for extended periods causes root damage and potential root rot within 24-48 hours.
Can I grow tomatoes in a single DWC bucket?
Yes — one cherry tomato plant per bucket works well. Larger beefsteak tomatoes need the bucket’s full capacity and good support (stakes or strings tied to overhead). Use a 6-inch net pot instead of a 3-inch, and be prepared for more aggressive nutrient consumption than lettuce or herbs.
How loud is the air pump in a kitchen?
With the noise reduction tips applied (folded towel underneath, pump placed on a shelf), the sound is a soft hum similar to a fridge. Most people stop noticing it within a day or two. If noise is a serious concern for a bedroom setup, choose a Kratky system instead — passive systems make zero noise.
What happens if the air pump fails?
Roots begin to suffocate within 12-24 hours. If you catch it quickly, the plant usually recovers when bubbles return. Replacement pumps cost £5-12 on Amazon UK and arrive next day. Keep a spare on hand if you plan to be away for more than a day at a time.
Can I make this system completely silent?
No — DWC fundamentally requires an air pump which will always produce some sound. For silent growing, use a Kratky jar or mason jar setup instead. These work slightly slower than DWC but produce zero noise.
Does this work for apartment living?
Yes, very well. The compact footprint (one 5-gallon bucket occupies about 30cm x 30cm of floor space) fits easily in most UK apartment kitchens. See our apartment hydroponics guide for placement tips.
Can children help build this?
Yes, with adult supervision for the cutting and electrical steps. Children can help with mixing nutrients, inserting seedlings, and daily monitoring. The bucket format makes the roots and growth visually accessible — much more engaging than hidden root systems in pre-built units. See our teaching kids hydroponics guide.
What’s the cheapest working version if I really want to minimise spending?
Skip the hardware-shop bucket and use a recycled 5-gallon paint bucket (wash thoroughly) or a large storage tub from Poundland. This can get the total build cost down to £20-25. See our 5 pound shop hydroponic systems guide for the ultra-budget approach.
Related posts you might find useful
- How to Start Hydroponics with Mason Jars — Simpler starter before scaling to DWC
- 5 Pound Shop Hydroponic Systems — Even cheaper alternatives
- DIY Hydroponics with Plastic Bottles — Zero-cost entry point
- Hydroponic Cost Breakdown — Full cost analysis across tiers
- Kratky vs DWC Comparison — Which passive/active system is right for you
- Hydroponic Root Rot Guide — Critical DWC troubleshooting
- 5 Best Grow Lights Under £100 — Lighting your DWC setup
Build Your First System on a Budget
Our 22-page ebook Build Your First Hydroponic System on a Budget includes 5 different system designs from £10 to £50, with detailed parts lists, assembly instructions, and troubleshooting for each.
✓ 5 detailed builds with photos · ✓ UK shopping lists · ✓ Cost-saving strategies · ✓ Instant PDF download